Friday, December 6, 2013
Tuesday, December 3, 2013
DIGM 680 - Shield to Sea
From Shield to Sea: Geological Field Trips From the 2011 Joint Meeting of the GSA
Late Devonian paleontology and paleoenvironments at Red Hill and other fossil sites in the Catskill Formation of north-central Pennsylvania
Edward B. Daeschler and Walter L. Cressler III
The stratified red beds of the Catskill Formation are conspicuous in road cut exposures on the Allegheny Plateau of north-central Pennsylvania. These sites have been central to recent investigations into the nature of Late Devonian continental ecosystems. By the Late Devonian, forests were widespread within seasonally well-watered depositional basins and the spread of plants on land from the late Silurian through the Devonian set the stage for the radiation of animals in both freshwater and terrestrial settings. A diverse assemblage of flora and fauna has been recovered from the Catskill Formation including progymnosperms, lycopsids, spermatophytes, zygopterid and stauripterid ferns, barinophytes, invertebrates, and invertebrate traces, and vertebrates such as placoderms, acanthodians, chondrichthyans, actinopterygians, and a variety of sarcopterygians including early tetrapods. Since the early 1990s, highway construction projects along the Route 15 (Interstate 99) have provided a new opportunity for exploration of the Catskill Formation in Lycoming and Tioga counties. The fauna along Route 15 are dominated by Bothriolepis sp. and Holoptychius sp. and also include Sauripterus taylori and an assortment of other interesting records. The most productive Catskill site, and the source of early tetrapod remains, is Red Hill in Clinton County. Red Hill presents a diverse and unique flora and fauna that is distinct from Route 15 sites, and also provides a spectacular section of the alluvial plain deposits of the Duncannon Member of the Catskill Formation.
Overview
-earliest paleontological investigations - 1830s and 1840s
-James Hall described pectoral fin of the rhizodontid sacropterygian Sauripterus taylori
-Charles Lyell passed through Blossburg in 1840 examined Catskill Formation
-additional fossil material was described by Leidy, Newberry, and Eastmann
-recent paleobiological investigations - 1993 ANSP
-Clinton, Lycoming, and Tioga Counties
-paleontological investigations have been closely linked with the construction of the railway system and the highway system
-Catskill Formation - composed of sand, silt, and mud deposited in a series of prograding deltas
-Catskill Delta Complex.
-clastic wedge derived from the middle to late Devonian Acadian Mountains shedding sediment westward and northwestward toward a shallow epicontinental sea in the foreland basin of the orogenic zone.
-studies have focused on the deltaic and alluvial plain facies at the top of the formation.
-Late Devonian
-time of major transitions in flora, fauna, and geobiological system
-forests were widespread within the seasonally well-watered depositional basins.
-dominant tree was the progymnosperm Archaeopteris (18 feet tall)
-first plant known with a bifacial cambium as in modern wood
-reproduced through spores
-Seed plants are first known from the Late Devonian (Rothwell, et al., 1989)
-opportunistic seed plants, growing in areas disturbed by fire, took advantage of the destruction of the widespread fern Rhacophyton (Cressler, 2006; Cressler et al., 2010a).
-Lycopsids were important swamp plants in the Late Devonian
-attaining the stature of small trees
-contributing to the thin coal seams known from the time
-small lycopsids are the precursors of the immense lycopsids that were the primary components of the Carboniferous coal swamps (Cressler and Pfefferkorn).
- Increased stature of the plants in the Late Devonian was accompanied by a concomitant increase in root zone depth, which led to increased paleosol development (Driese and Mora, 1993).
-Spread of plants on land - set the stage for the radiation of animals in both freshwater and terrestrial settings.
-large, suspension-feeding bivalves, Archandon catskillensis
- recorded sporadically from Catskill formation
-fossil terrestrial arthropods (first known from the Silurian)
-millipedes (Wilson et al., 2005)
-scorpions and a trigonotarbid arachnid (Shear, 2000)
-no evidence of herbivory of living plant tissue during the Late Devonian.
-increased contribution of organic detritus by land plants to terrestrial and freshwater ecosystems during this time provided the primary productivity for these increasingly complex and diverse ecosystems
-Vertebrate assemblage
-placoderms, acanthodians, chondrichthyans, actinopterygians, range of sacropterygians
-at least three species of tetrapods
-two distinct faunas characterize the vertebrates from the Catskill Formation
-Holoptychius sp.
-Bothriolepis
-these appear to be organisms mainly restricted to lower alluvial plain - deltaic habitats.
-Some of the sarcopterygians (particularly the tetrapods) are lineages adapted for mobility in stream channels and shallow obstructed waters, a habitat that the well-vegetated alluvial plains of the Catskill Delta Complex seem to have provided.
Day 1
Road Log
Stop 1. Powys Curve
-fauna is dominated by the antiarch placoderm Bothriolepis sp.
The “Bothriolepis Problem”
Thomson and Thomas (2001) and Weems (2004) reviewed the taxonomic status of Bothriolepis from the Catskill Formation.
-it is clear from these papers that the diagnosis of species-level features in Bothriolepis from the Catskill Formation is a microcosm of the issues concerning species-level taxonomy of this cosmopolitan Late Devonian genus more broadly.
-Bothriolepis material from the Catskill Formation was first described by Leidy (1856) as Stenacanthus nitidus based on a distal portion of the pectoral appendage
Sunday, December 1, 2013
DIGM 620 - Week 10 or 11
Let's talk about presenting 3D models in a browser. While my project is currently set up to produce an animated clip, I have not ruled out other ways of presenting an ontogenic animation. The main drawback of a digital animation is the lack of interaction (besides a pause and play button). It would be great to allow the user the ability to interact with the ontogenic animation on their own.
This is where WebGL (Web Graphics Library) comes in. WebGL is a Javascript API that is present in most modern browsers. Services like p3d.in and Sketchfab are services that create easy to use interfaces for users to share 3D models.
A cursory search reveals several examples of interesting things being done with this technology:
WebGL Interactive models
http://www.ibiblio.org/e-notes/webgl/models.htm
Rigging and Skeletal animation in three.js
http://blog.romanliutikov.com/post/60461559240/rigging-and-skeletal-animation-in-three-js
Three.js
http://threejs.org/
I'm not making any promises, but using WebGL would certain allow for some interesting opportunities.
Hours
Presentation Prep 5 hr
Post processing 5 hr
Sunday, November 24, 2013
DIGM 620 - Final
I have (more or less) figured out the final part of my photogrammetry workflow. Previously, I was generating a model that was an incredibly dense topology and an ugly UV Map. Large models take up a lot of memory and made online sharing and management an issue. For this reason I have been seeking a way to create a low polygon model that maintains most of its texture details. I have heard about ways of doing it, but finding the exact combination of tools has proven allusive. I had experimented with Mudbox, but I ended up hitting a way. Finally with ZBrush I took my high-poly model through towards completion. Let me show you my procedure.
First bring your obj (exported from Meshlab) into Zbrush.
Go into the Texture Map menu and upload the texture map (also from Meshlab)

You might want to switch your material to a flatshader so that you can see your material

To make the texture information transferable, we need turn that Texture Map information into intermediary Polypaint information. First add a few subdivisions to your model (keep it around 1 million polygons), then hit the "Polypaint From Texture" button. The roundabout pathway is this: Begin with aTexture Map > Turn it into Polypaint > Turn it back into a new Texture Map.

Next duplicate your object so that you have a second subtool. This will be the low-poly mesh that will receive all texture information. To make a quick low-poly mesh, use something like ZRemesher.
Here is my reduced mesh.
At this point you should have two subtools: your original high-poly mesh and one reduced copy.
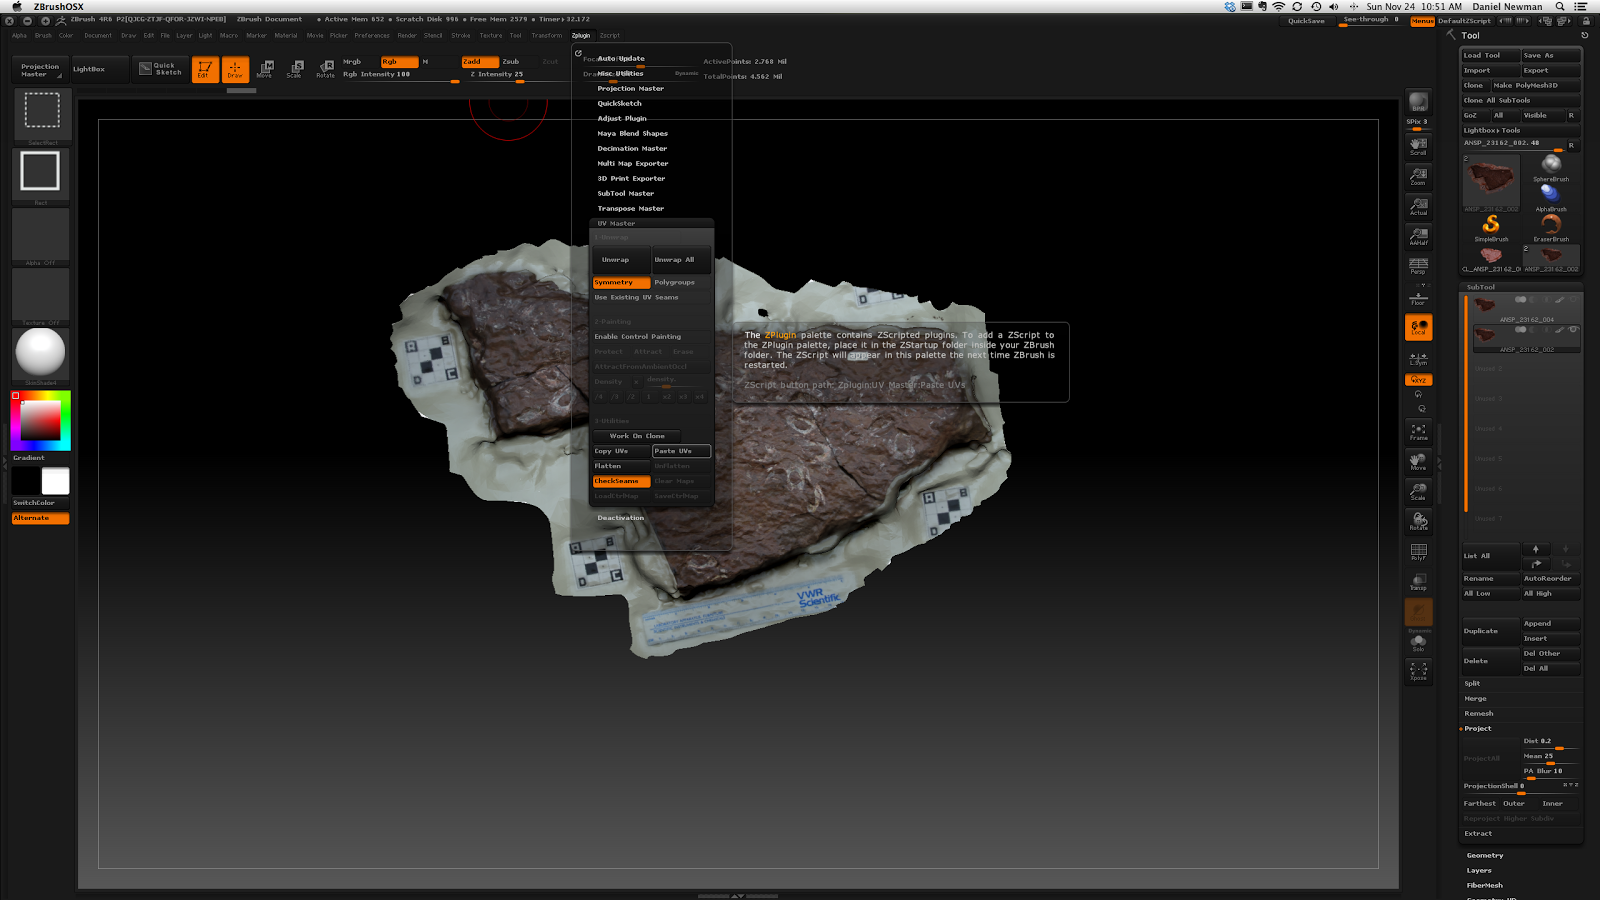
This new mesh doesn't have a defined UV Map, so let's go to the UV Master Zbrush plugin menu. It will ask you to work on a clone (a third-mesh). There are a diversity things you can tweak in this menu, but for simplicity just hit Unwrap and see what happens.

Here is cloned mesh. The orange lines show seambreaks.

When satisfied, copy your UV maps (there is a button) and then past them onto your low-poly model. Your low-poly mesh now has a UV map and so can hold a texture map of its own. The UV map is also much clearer and neater then the source model's map.

With your original mesh as the top subtool and your low-poly mesh below it and selected, hit the ProjectAll button. This will project details and texture information from the top model to the bottom. I only tweeked the Dist slider (from default of 0.02 to .2)

If this menu pops up, then it probably worked. Hit Yes.

After projection, here are the two models. On the left is the original mesh (299,190 faces, 64.3 MB) and the reduced mesh (10,968 faces, 1.6 MB). It's a quite large reduction in size but at a minimal loss in detail.

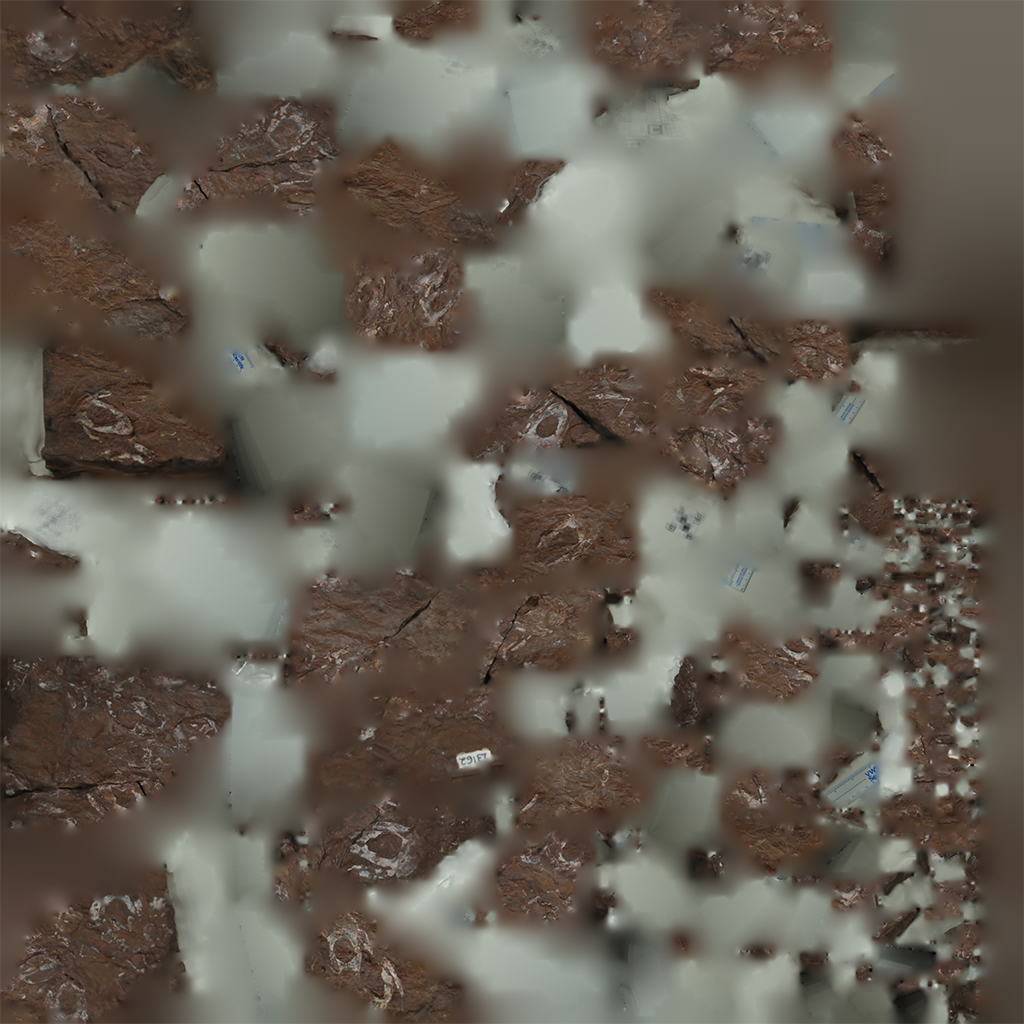
Here is the original mesh's UV texture map. Unpleasant, isn't it?

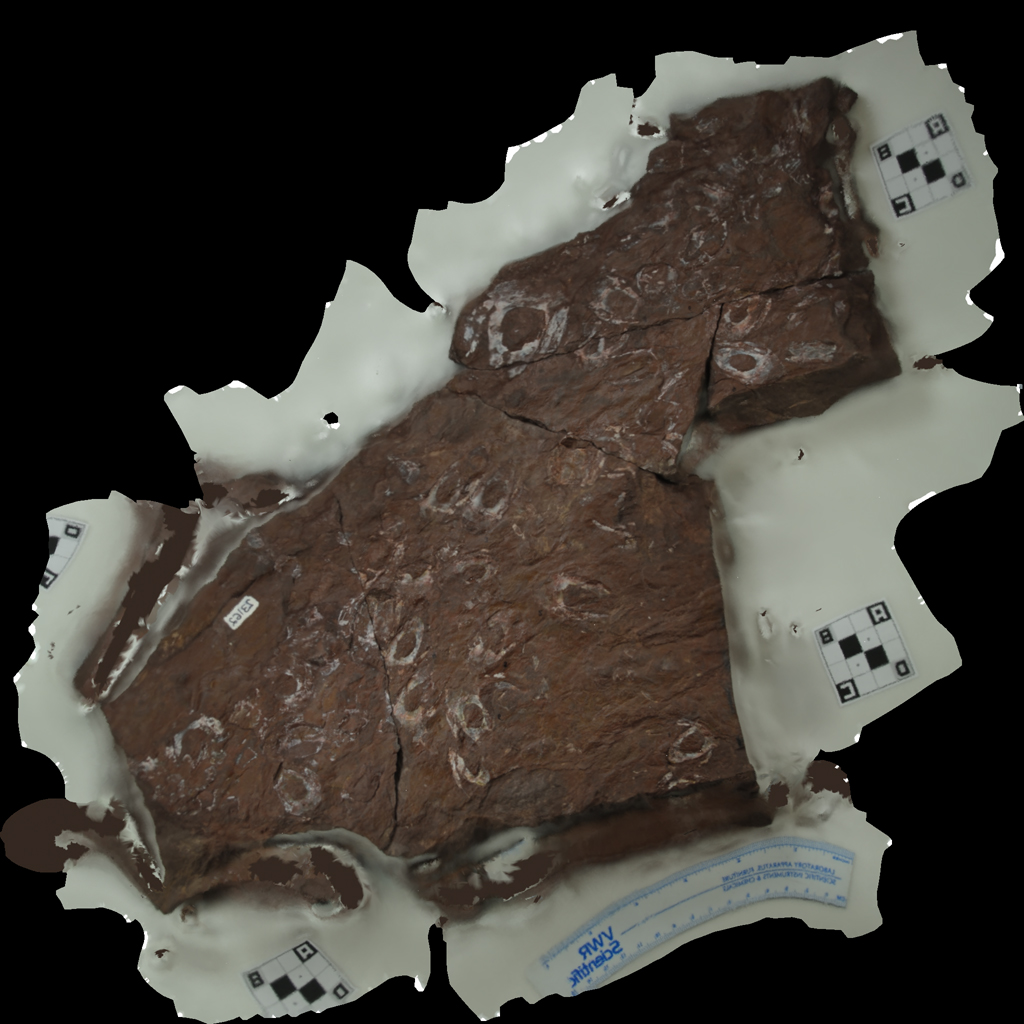
Here is the reduced mesh's UV texture map. Notice the vast improvement in clarity and neatness.

Likewise, the normal map

Hit the Goz button to send your model and textures into Maya if you'd like.

Or upload them to an online 3D model service like p3d.in

Final Presentation
Hours
Workflow Troubleshooting: 5hrs
Presentation (Defence & 620 Final): 5 hrs
First bring your obj (exported from Meshlab) into Zbrush.
Go into the Texture Map menu and upload the texture map (also from Meshlab)
You might want to switch your material to a flatshader so that you can see your material
To make the texture information transferable, we need turn that Texture Map information into intermediary Polypaint information. First add a few subdivisions to your model (keep it around 1 million polygons), then hit the "Polypaint From Texture" button. The roundabout pathway is this: Begin with aTexture Map > Turn it into Polypaint > Turn it back into a new Texture Map.
Next duplicate your object so that you have a second subtool. This will be the low-poly mesh that will receive all texture information. To make a quick low-poly mesh, use something like ZRemesher.
Here is my reduced mesh.
At this point you should have two subtools: your original high-poly mesh and one reduced copy.
This new mesh doesn't have a defined UV Map, so let's go to the UV Master Zbrush plugin menu. It will ask you to work on a clone (a third-mesh). There are a diversity things you can tweak in this menu, but for simplicity just hit Unwrap and see what happens.
Here is cloned mesh. The orange lines show seambreaks.
When satisfied, copy your UV maps (there is a button) and then past them onto your low-poly model. Your low-poly mesh now has a UV map and so can hold a texture map of its own. The UV map is also much clearer and neater then the source model's map.
With your original mesh as the top subtool and your low-poly mesh below it and selected, hit the ProjectAll button. This will project details and texture information from the top model to the bottom. I only tweeked the Dist slider (from default of 0.02 to .2)
If this menu pops up, then it probably worked. Hit Yes.
After projection, here are the two models. On the left is the original mesh (299,190 faces, 64.3 MB) and the reduced mesh (10,968 faces, 1.6 MB). It's a quite large reduction in size but at a minimal loss in detail.
Here is the original mesh's UV texture map. Unpleasant, isn't it?
Here is the reduced mesh's UV texture map. Notice the vast improvement in clarity and neatness.
Likewise, the normal map
Hit the Goz button to send your model and textures into Maya if you'd like.
Or upload them to an online 3D model service like p3d.in
Final Presentation
Hours
Presentation (Defence & 620 Final): 5 hrs
Tuesday, November 19, 2013
Sunday, November 17, 2013
Week 8 - 620
News
This past week the Smithsonian held a conference to talk about and demonstrate their attempts to digitize collection. Their pilot program released a dedicated website to host a series of objects from the institution's collections and a powerful 3D viewer to present them. These objects include prehistoric whale skeletons, CT-scanned insects, even a whole mammoth skeleton. Everything they mentioned echoes what my thesis has been striving for: accessibility, engaging the public, mobilizing the 99% of collections that remain undisplayed, and science outreach. This is only the most recent example of a digital museum collection announcement.
Website
I set up a quick Wordpress site to eventually host my final animation. Other digital museum objects are being given dedicated sites, so I think this is the way to go. Right now I just a placeholder Vimeo video and a p3d.in embedded 3D model, but eventually there will be more content associated with the project (concept art, etc).The site is available here:
http://www.danieljoelnewman.com/bothriolepis/
Sections
Here is a graphic that I hope will explain the overall structure of the animation. There will be three main sections: a contextual section, an ontogenic section, and a cinematic or environmental section.
Hours
Setting up Wordpress 2 hrs
Troubleshooting Workflow 2 hrs
Presentation Prep 2 hrs
Research & Reading 2 hrs
Sunday, November 10, 2013
Week 7 - 620
I have been looking for an alternative workflow to 123D Catch due to some of limitations I've encountered. While the service does generate some nice results, it is a blackbox situation where I have little control over what is going on.
I have come across a separate workflow that relies entirely on open-source, free programs. VisualSFM (Structure from Motion) is a bundle of programs that can generate a point cloud from a series of photographs. This point-cloud can then sent to Meshlab in order to generate a polygonal mesh. After many attempts, I have finally sent a sequence of photographs through the entire workflow to generate a model. One positive aspect of this workflow is that a single UV map is generated.
| Blackbox |
I have come across a separate workflow that relies entirely on open-source, free programs. VisualSFM (Structure from Motion) is a bundle of programs that can generate a point cloud from a series of photographs. This point-cloud can then sent to Meshlab in order to generate a polygonal mesh. After many attempts, I have finally sent a sequence of photographs through the entire workflow to generate a model. One positive aspect of this workflow is that a single UV map is generated.
| Sequence of Blackboxes |
 |
| VisualSFM Interface - Dense Reconstruction |
 |
| Dense Reconstruction in Meshlab |
 |
| Polygonal Mesh in Meshlab |
 |
| Final Mesh in Maya |
 |
| Retopology |
I have also begun generating some environmental assets for the future animation:
Hours
Research & Writing: 2 hr
Workflow Troubleshooting: 5 hrs
Asset Creation: 3 hr
Research & Writing: 2 hr
Workflow Troubleshooting: 5 hrs
Asset Creation: 3 hr
Sunday, November 3, 2013
Week 6 - DIGM 620
Here's a prototype of scaling being applied to an ambient animation.
Here are some early storyboards
Hours
Storyboarding 2 hrs
Prototype Rig - 2 hrs
Reading and Research - 1 hr
VirtualSFM experimenting - 5 hrs
Wednesday, October 30, 2013
Sunday, October 27, 2013
DIGM 620 - Week 5 Review
Here is one of the adult specimens that I generated photogrammetrically.
Here is a look at a slab of juveniles from the 123D Catch Desktop Interface.
Dave had suggested I invest a little more time into R&D of the rig to facilitate development down the road. Here I've modeled a very simple Bothriolepis in order to test out some of the properties of the hybrid animation/ontogenic rig.
Here are some rough anatomical sketches. I'm just trying to get aquatinted with all the armor plates and their positions.
Hours:
Meeting with Dave (.5 hr)
Meeting with Stefan (.5 hr)
Attempts to use ARC3D Serive (1 hr)
123D Processing (1 hr)
Concept art (3 hr)
Prototype rig (2 hr)
Readings (3 hr)
Wednesday, October 23, 2013
Tuesday, October 22, 2013
Subscribe to:
Comments (Atom)


